How to Edit Your Videos Online for Free (Quickly & Easily)
When it comes to the content creation process, video editing is a crucial part. It’s an acquired skill but learning what type of software to use and getting started with one can be super tricky and too time-consuming. What if we tell you that you could do it in a few minutes? Well, yes! Here’s a guide that shows you how to edit videos online for free.
So, no more installations or learning any complicated video editing tool. You can start editing with confidence and in no time.
How to Edit Your Videos Online for Free
Whether you want to edit a video to change the aspect ratio or to perfect it with a few elements or complete your upload time on YouTube quicker, this blog has got you all covered.
From adding music, sound effects, text, images, captions to allowing you to trim and merge, a good video editor should be able to do every little thing. That’s where a tool like Typito comes in. Let me show you how you can use this tool’s features and edit your video within 5 minutes.
1. Sign Up and choose your video format
- Go to typito.com and sign-up for free. You can create your account using your email ID or Facebook or Google. Pick whatever is convenient to you.
- After you create your account, you will see Typito's homepage. Click New Project.
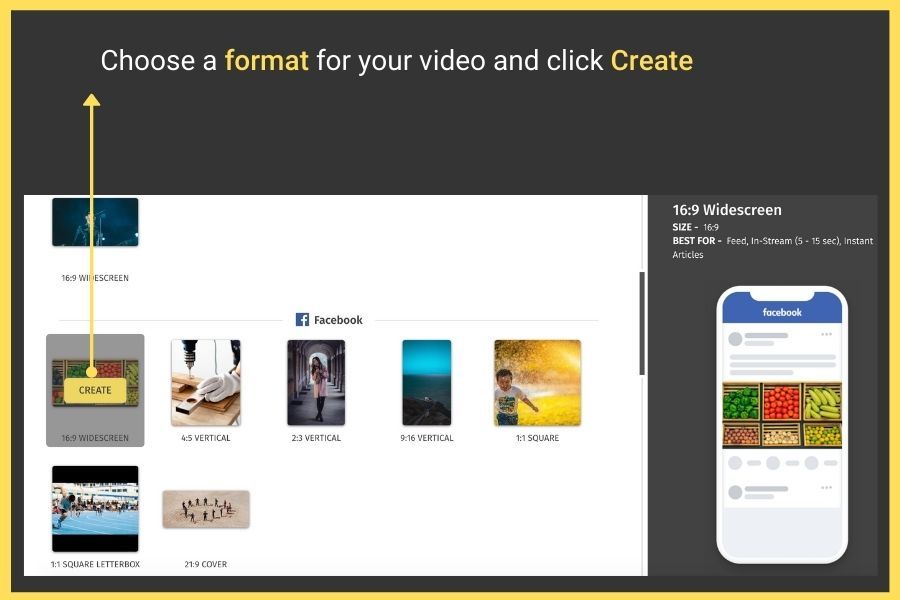
- You will be then redirected to a page that shows a list of video formats.
- Hover on the format you want to edit your video in. Then click the create button.
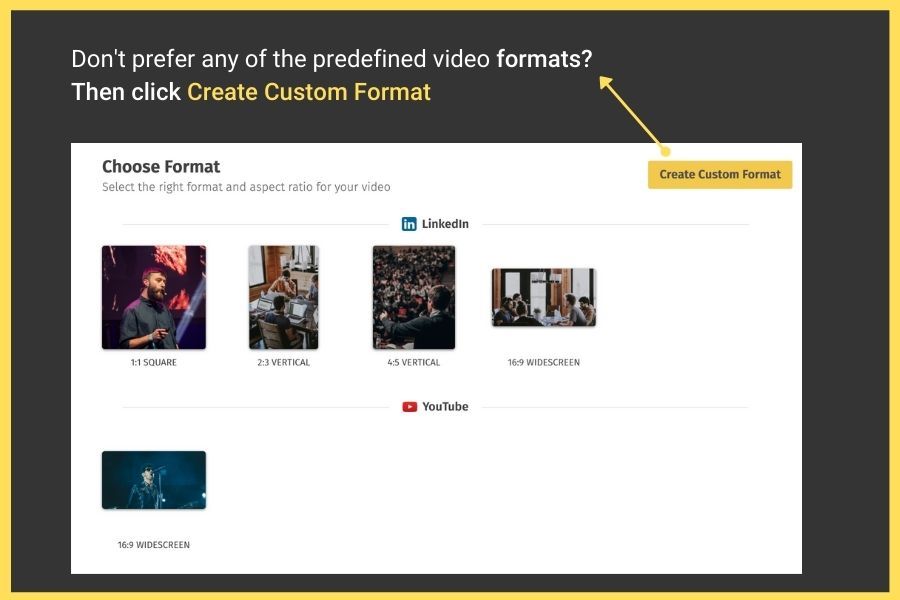
- If you don’t want to use any of the predefined video formats and want to go by creating your own, just click on the Create Custom Format button on the top.
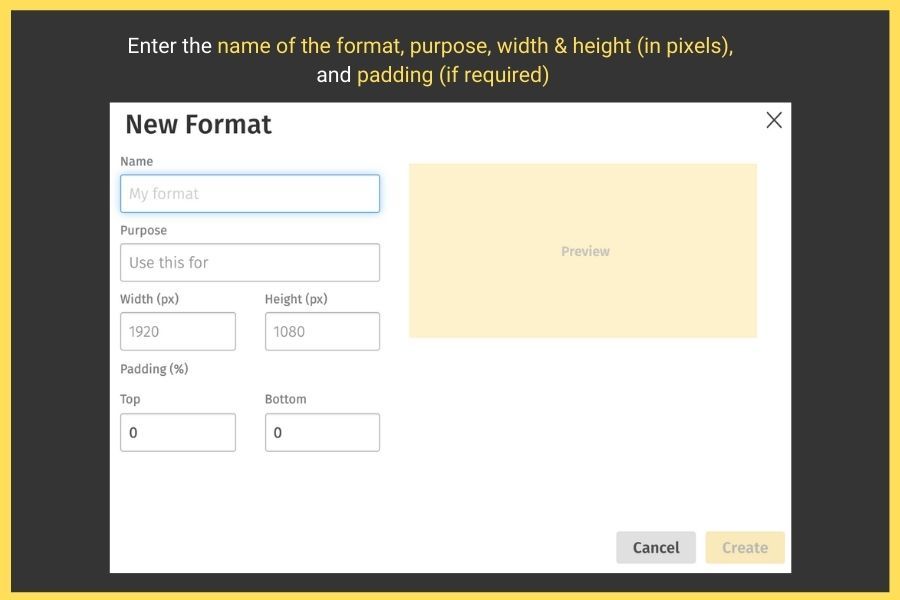
- A pop-up opens, prompting you to enter the video format name, its purpose, height & width (in pixels), and padding details (in %). After you enter the details, the Create button enables. Click on it.
2. Upload the video that you want to edit
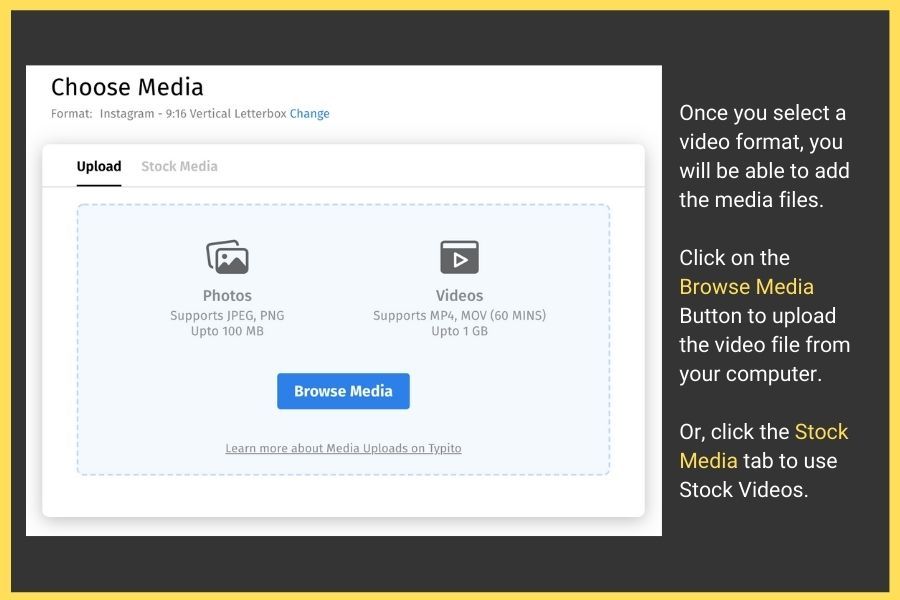
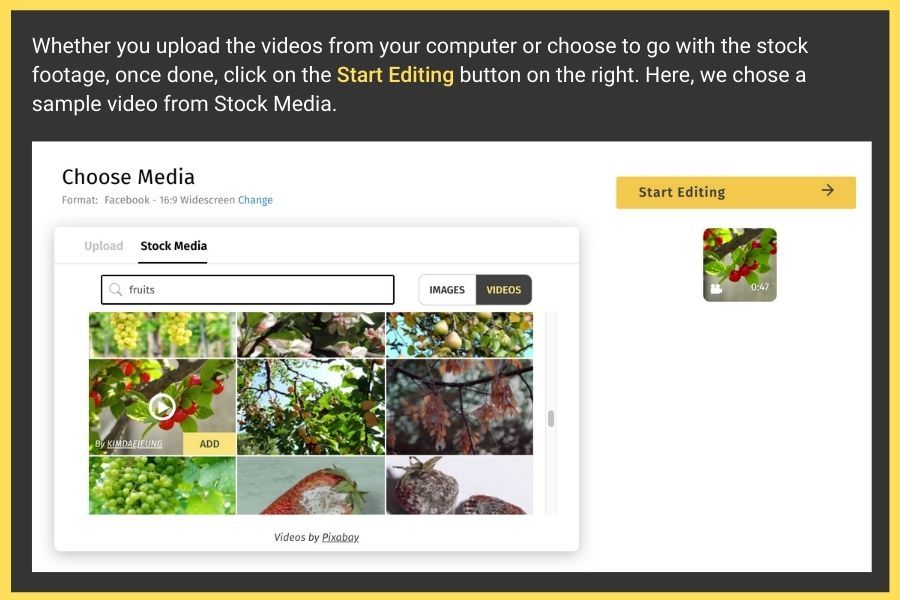
Whether you choose from the list of predefined video formats (whether it’s Facebook, YouTube, Instagram, Linkedin, Twitter) or use custom format, you will be redirected to a page with 2 options to help you import a video:
- Upload: Allows you to upload a video from your computer
- Stock Media: Allows you to choose a video from an integrated stock footage library
Since you want to edit your video, click Browse Media from the Upload section and choose your clip from your computer.
Depending on your video size, uploading might take from a few seconds to minutes. Once it is complete, you will see the Start Editing being enabled on the right. Click it.
3. Edit the video and give it a professional look
The dashboard of Typito then opens up with the video that you had uploaded in the exact format (or dimensions) you had chosen.
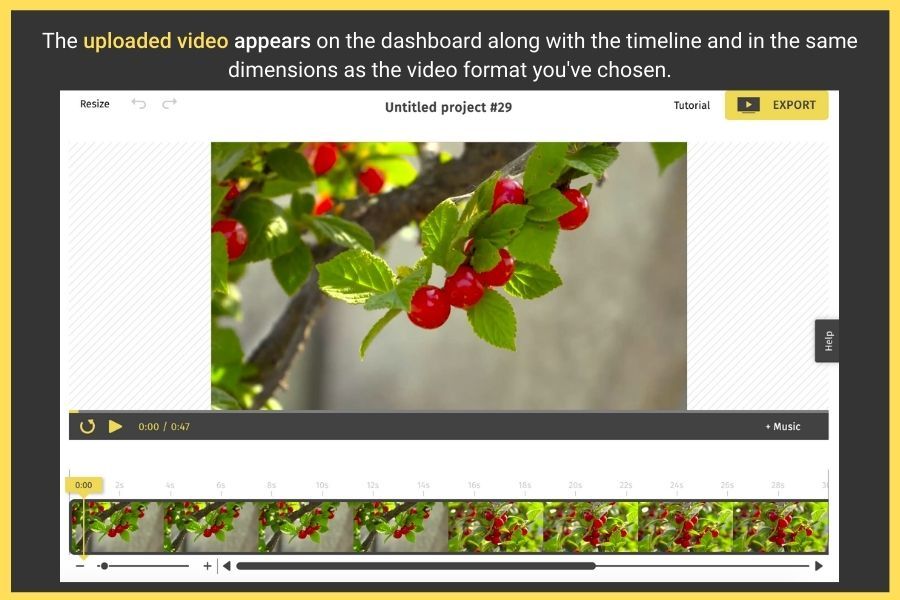
The dashboard is simple and easy to understand. On the left, you will see 5 different features that you can use to beautify your video, which are:
- Text
- Images
- Audio
- Media
- Captions
Let’s quickly understand what each of these features does and how it can help edit your video in no time.
A. Adding text to your video
As the name implies, the “text” feature lets you add text to a video. It offers a wide range of basic, animated, and stylized text templates for you to use from.
To play around with this feature and apply it to your video, here’s what you need to do:
- Click on the Text icon from the left panel.
- The section pops open an array of predesigned text templates to choose from. It’s pretty straightforward to use but if you’re looking for a starting point, then we suggest picking from any of these stylized text templates.
- No matter what you want to go with, click once to insert to your video workspace on the right.
- You can edit the template with the text that you want and further, enhance its overall look by changing the font size, color, style, letter space, alignment, line height, etc. The tool also gives you an option to add animation effects to the text at varying speed levels.
- That’s not just it. The “text” feature comprises a few other sub-categories such as:
- Titles: Has basic as well as stylized titles templates
- Social Media: Has predefined templates featuring both text and social media icons
- Lower Thirds: Has stylized and basic lower third text templates
- Branded: Has predefined templates to add your brand name and logo
To use any sub-text templates, click once on it. This will automatically add it to your video on the right. The template can be dragged and placed anywhere around the video.
B. Adding image to your video
This feature is super handy if you want to add an image overlay to your video, icons, logo, shapes, or any geometrical shape.
Here’s what you need to do:
- Select the Images tab from the left pane. This will show 3 options: Shapes, Icons, and My Uploads.
- Shapes: Has predefined geometric shapes that you can add in your video
- Icons: Has a set of popular icons that you can add in your video
- My Uploads: Allows you to upload images, icons, or logos you want to add in your video
Note: Clicking once on any template will automatically add it to the video on the right.
C. Adding audio to your video
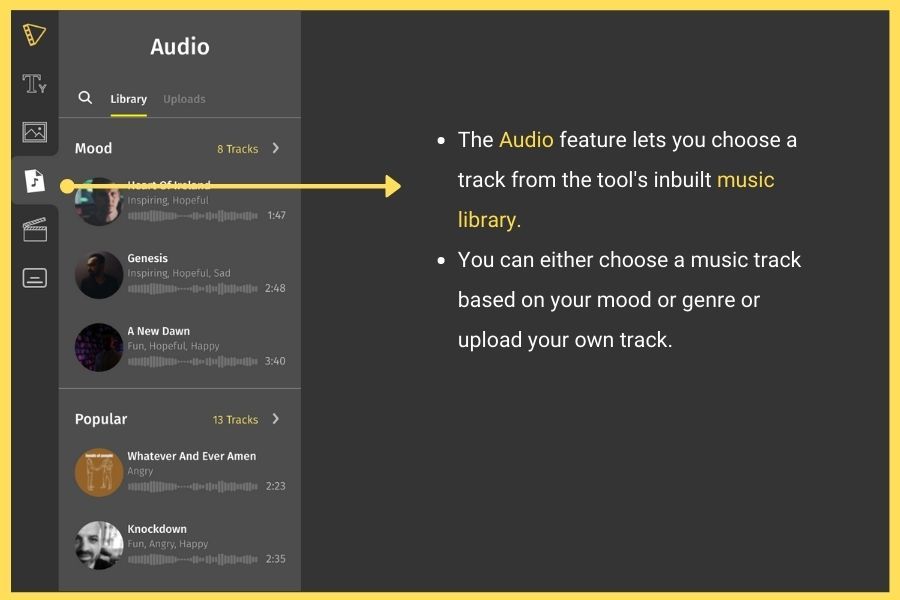
Good audio in the background makes all the difference to your video. It not only creates engagement but also leaves a huge impact on the viewers. You don’t have to learn complicated tools to do this. Typito’s audio feature gets it done in 2 minutes. From helping you create an amazing intro & outro to adding music based on the mood to let you adjust the volume, the “audio” feature takes care of it all.
To use this feature, here’s what you need to do:
Select the audio icon from the left panel. This shows you 2 options.
- Library: Features 150+ tracks that are listed based on mood. Hovering on each track shows an add button. Clicking once on it applies the music track to the video on the right.
- Uploads: This allows you to upload a music file from your computer.
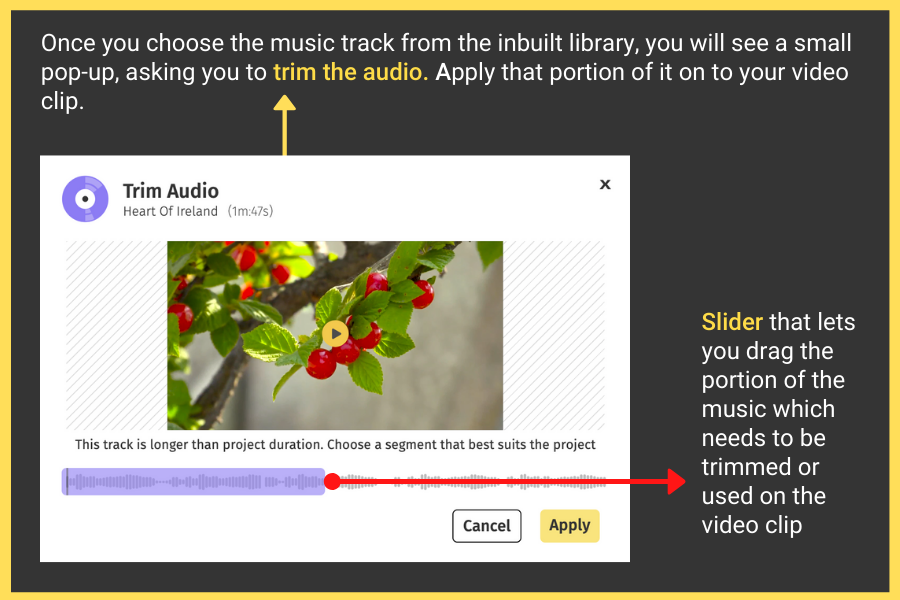
- Whether you’re choosing a music track from the inbuilt music library or uploading your own, a pop-up shows up instantly, enabling you to trim a specific portion of the audio via a smooth slider.
- Just drag to select the audio portion. Click apply.
Note: The length of the slider is automatically adjusted based on your video’s total duration. Thus, the selected music portion will be automatically applied to the entire video (from beginning to the end) after you click the “apply” button.
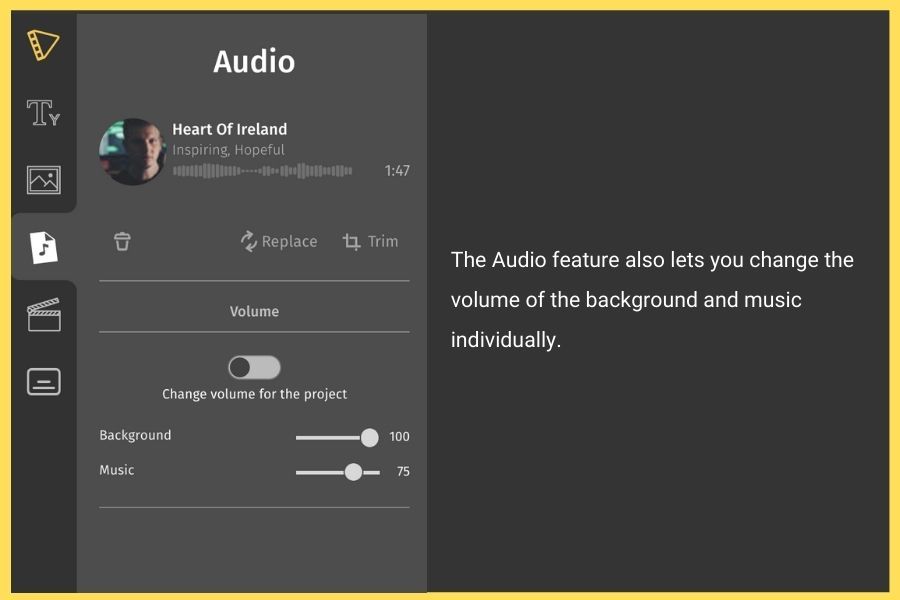
- The trimmed audio portion is now added to the video. Interestingly, you also have an option to modify the volume of the track and the background music anytime.
D. Adding an image to your video
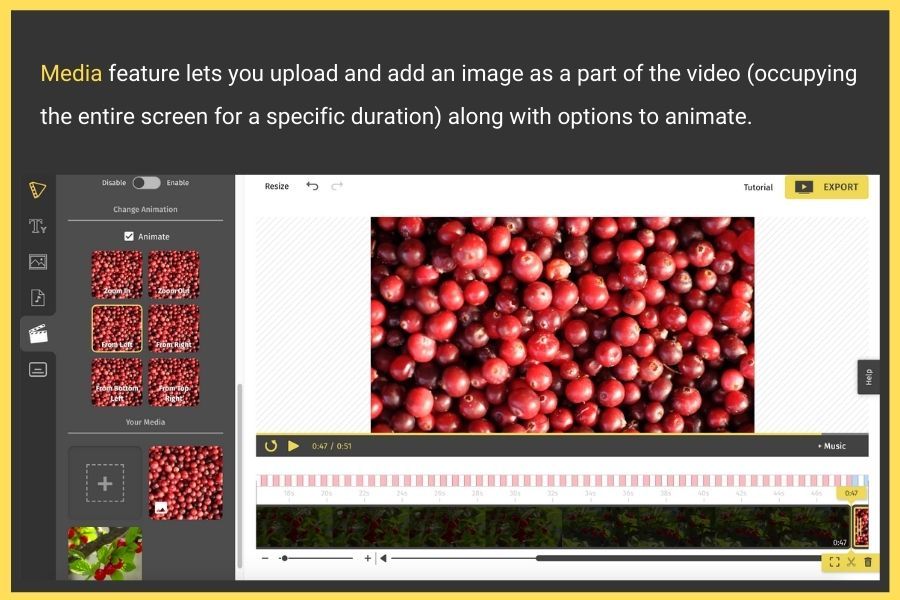
The Media section allows you to not just upload images and logos but also keeps them until you delete them. The feature is especially useful when you want to use an image as a part of the video along with some transitional effects.
Note: To add an image as an overlay to the video, you use the “Images” feature whereas to add an image as a part of the video (occupying the entire screen for a specific duration) along with a transitional effect, you use the “media” feature.
E. Adding captions to your video
Subtitles or captions are one of the best features of Typito and adding them to the video is extremely easy. In fact, it just requires a few clicks.
Follow these steps to add captions to your video:
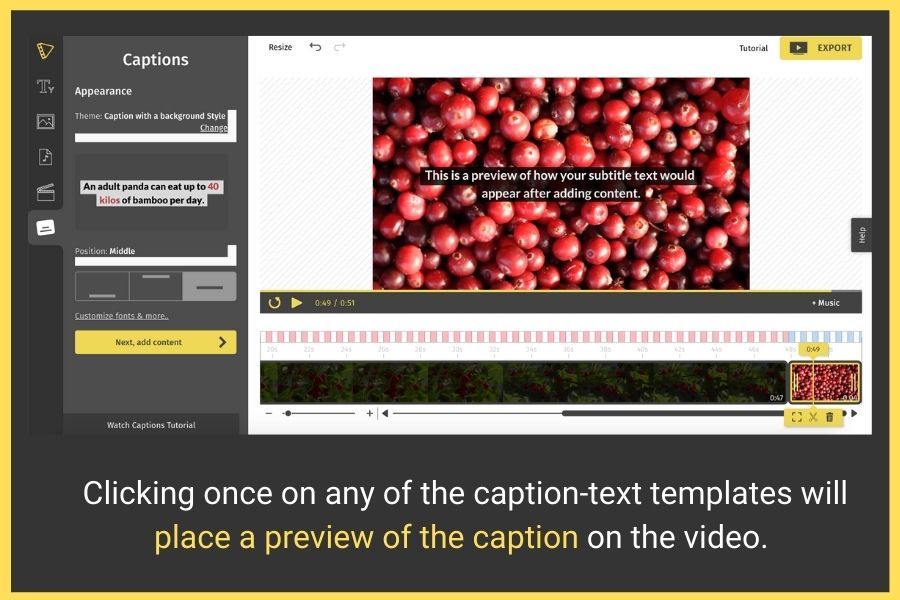
- Select the Captions icon from the left panel.
- Choose any of the stylized text templates shown.
- Click once to apply to the video on the right. Doing this will give you a preview.
- Also, you’ll see an option called Position, which lets you align the captions to top, middle, or bottom.
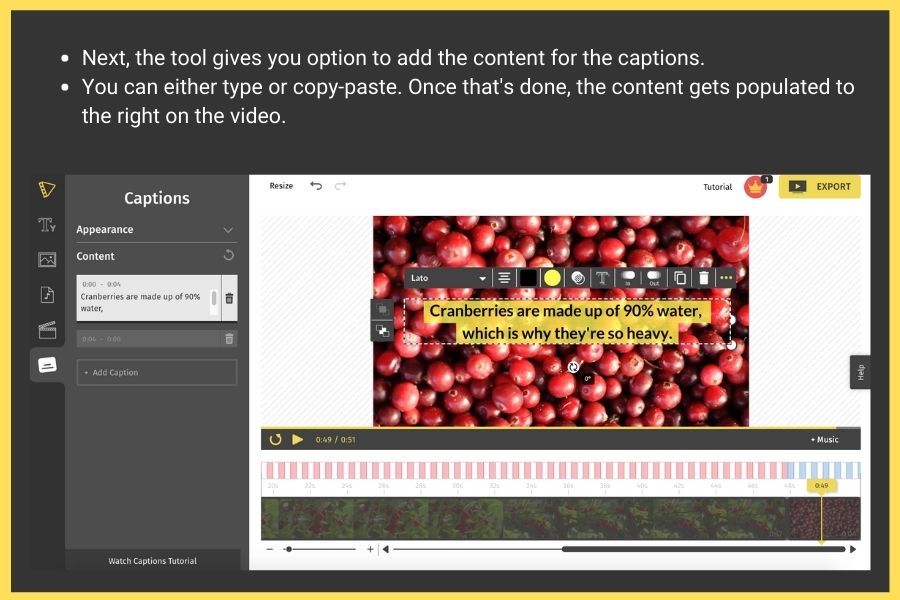
- After you choose the captions template and align it, click on the “Next, add content” button. This again will give you three sub-options to add the content:
- Voice to text: This lets you transcribe the speech or voice into captions in minutes.
- Manually: Let's you listen to an audio and then, type your captions manually.
- SRT upload: Let's you upload a subtitle file to your video.
- Add the content for the captions in the left box. This will instantly populate it on the right. Further, you can add the font color, style, size, and background color to beautify it.
- You can even adjust the letter spacing and line-height. More than that, the tool lets you add animation effects to the captions. You can play around with it to see what suits your video.
4. Download the edited video
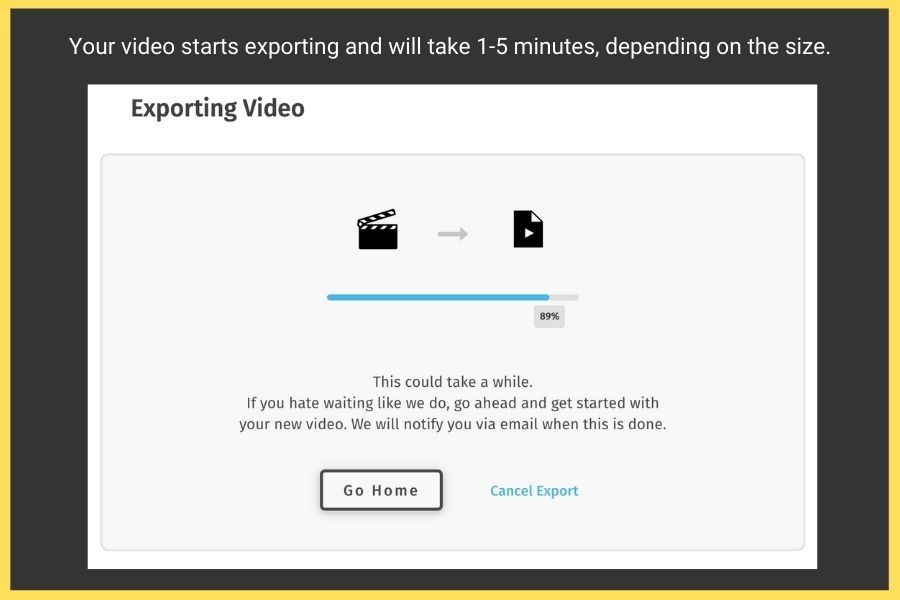
After you have beautified your video and added that professional touch, click on the Export button to begin the exporting process.

- This takes some time, depending on the video size.
Once the export process is complete, your edited video can be:
- Downloaded to your local drive
- Posted on Facebook
- Published to your YouTube channel

Now that you know how to edit your videos online for free, the next step is, to begin with, one. But before you head to that step, here are a few tricks you need to keep in mind while editing.
7 Video Editing Hacks Nobody Will Tell You
Videos are one of the most powerful and influential storytelling mediums—they not only serve as a supreme ground for any promotional campaigns but also for content efforts. A video’s emotionally-resonant blend of motion, visuals, and sound can help one drive deeper, satisfying the relationship between a brand and its audience.
Whether it’s to market your service or product, creating a video is a no-brainer. It is a shareable and easy way to convey your brand’s core message. They not only lead to a higher ROI but also increase the chances of conversions by 144%.
Are you a vlogger who is looking to start this new year off with video editing skills? Or maybe, you have a career planned out as a video editor. It doesn’t matter where you see yourself as a video editor, but it’s important to know the hottest editing tips to stand out.
The subtle alchemy that takes place behind scenes is kept a secret because it separates cinematic videos from collage film. Every enrapturing video we come across is a result of hours of painstaking composition and most importantly, professional editing.
Unbeknownst to most people are simple tricks that add a touch of magic to the scene. So it’s not always about increasing the post-production budget to use high-editing editing tools. A lot of pro editors go beyond traditional video editing etiquette to make videos special.
The editing tips you’re about to discover for the first time in this blog will redefine visual storytelling because they are unconventional and easy to learn with a little effort. If honed with dedication, you could master techniques that’ll make your videos wow-like.
How to Edit Videos Like A Pro?
Firstly, video editing is not a go-by-the-book process. A lot of creativity is invested in post-production to turn raw footage into a magnanimous picture book that comes alive in front of people’s eyes.
So a lot happens besides cut types and transitions, which you will learn in a bit. So let’s dive in without ado:
1. Speed Up with Shortcuts
Do you fumble with the workbench buttons and clickable options? It’s worse if you stick to that approach. You could lose focus on the style you’ve planned to amp up your project with.
So the initial step is to master shortcuts to speed things up by a notch. This means figuring out where the combo buttons are and how to use them effectively to avoid the extra seconds spent navigating through toolbars and menu trees.
2. Merge Videos with Perfect Soundtrack
Muted videos baffle visual senses. With a scene deprived of intensity, context is quickly lost in translation. Bad SFX is equally appalling because it fails to add layer and depth. Imagine hearing EDM beats while the frame cut out to a wedding in Cathedral.
Sounds confusing, doesn’t it? A suitable audio track or SFX immediately puts context and relevance to work. Matching audio and video suitably causes characters and on-screen elements to appear related. Most raw footage will have audio and video merged separately in the production phase.
The merging or mixing is where scene sequence and transitions are well-timed to induce a realistic feel to the project. If you prefer Adobe Premiere, the vast built-in library has audio tracks ready for drag and drop operation. If the stock library seems insufficient, additional ones can be purchased.
3. Actuate Speed Ramp to Add Intensity
Action scenes shot at regular speed might feel meh. A little tweak with speed ramping raises the bar immediately. Take a look at Michael Bay’s explosive visual style. Would Transformers be the same if it weren’t for the dramatic slow-motion fights?
Or Neo’s gravity-defying bullet dodging scene in Matrix? Speed ramping is an intelligent way to tweak the sequence rate to make scene transitions fit together as a great package. Scenes can be sped or slowed to achieve dramatic action.
4. Cut or Cover Irrelevant Portions
Editing interviews demand a specific approach which is not the same as editing clips. Suppose your project is a long interview with plenty of chatter, compensated with b-roll or a+b roll to keep the content crisp.
Cut scenes accordingly to retain important quotes and eliminate insignificant bits that lower the quality of speech. This technique retains the best portions of the interview while covering up extra bits like pause fillers or hesitation forms.
You may also jump to live audio during the video sequence to reset the program or introduce another.
5. Use Creative Effects as Fillers
Scene transitions affect video quality. Try to keep the flow and context consistent while weaving great video stories. A video cutting to another location or scene without awkward gaps electrifies post-production quality.
It’s not always necessary to inject jumpscares or drama as fillers. Use voice zoom to make the character’s voice dominating to maintain an unbroken connection with viewers.
Pausing the a-roll in a soundbite and using intense BGM as fillers elevate mood and excite viewers. It makes narration stand out for its concision.
6. Stabilize the Video
The difference between content that is forgettable versus the one that is etched in people’s thoughts is the smoothness. Distorted videos without scene stabilization or quality audio are the butt of all jokes because, let’s agree nothing screams fake louder than shaky UFO videos.
They are traditionally the material people pull up to hurl insults. However, in journalism, where impromptu shots are critical to report the truth, it’s not always a dead end when videos are jumpy or shot in the heat of the moment while evading threat.
Sometimes, using plug-ins go a long way in stabilizing the footage. A few proprietary editing tools offer a small bandwidth to stabilize shaky footage without ruining its originality.
The ultimate goal is to stabilize footage so it appears coherent to the eye. You may have to perform several tweaks to settings to achieve results closest to your expectations, but then the outcome isn't always guaranteed. Extreme bounciness isn’t something software can fix, it could only be improved by learning from mistakes and filming from a stable platform.
7. Re-frame Sequences
Modern digital cameras or SLRs are shooting sharper and more vibrant images than a decade ago. The resolution war between camera manufacturers has given filmmakers and editors the ability to reframe and introduce special effects that were tough to achieve in the past.
Now that 16:9 (1080i) is the norm, suddenly there’s room for editors to work with 2K, 4K, and 8K resolutions. Most editors confuse the number of pixels they have to work with, but in reality, they should be concerned about how far a push in can be achieved till it stops appealing to the eye.
Using a 1:1 image isn’t the same as a well-composed oversampled source. Look for the surrounding details and if it doesn't seem blurry, continue adding push-in to a tense scene or the subject tracked by the AF sensor.
In most cases, scaling above 110% leads to pixelated footage. It’s a trade-off while shooting with a low-resolution camera. Repositioning the clip doesn’t compensate when subjects are incorrectly placed within the frame.
Conclusion
If you have no prior video editing knowledge, the editing tips mentioned above will help you become a pro. You could practice each technique to understand the before and after comparison before moving on to major projects.
While other jobs have SOPs that are easy to follow, video editing is a skill where your goal is to make the video content appealing to the eye. You could stick to conventional editing and not risk the quality or merge techniques to create a rare effect.
Raw footage can be edited in unlimited ways in post-production to increase its value. This is where it pays to have the right amount of creativity and software. With tools like Adobe Premiere Pro and Final Cut, there’s room for innovation without hurting the quality or the audience’s ability to reflect on what they’ve picked up from the clip.
The editing technique for filmmaking is not the same used in news reporting or web series. Each genre demands a carefully picked approach for greater production value. The goal is to apply the right methods that are best suited for the type of audience to keep them riveted to the content.
Imagine Titanic scenes with the sound of seagulls and ocean waves than the dramatic orchestra and SFX. It would have received nominations to the hall of shame instead of Oscars.
So I hope now you know how you can turn regular footage into great content. If you did, make sure to share these secrets with your peers.


![Best YouTube Outro Templates [Tips + Inspiration]](/blog/content/images/size/w750/2022/11/Blog-Articles---Featured-Images-Illos--23-.png)